雲端相信大家都不陌生,日常生活中有許多的應用程式,都是運行在雲端平台上,讓使用者可以不受地點的限制,只要能夠連上網路,就可以使用雲端上的服務。
在[Python爬蟲教學]活用openpyxl套件將爬取的資料寫入Excel檔案文章中,分享如何將Python網頁爬蟲取得的股票當日行情資料,寫入本地端的Excel檔案中,而今天到了外地,沒有了這台電腦,則無法存取到其中的Excel檔案,這時候,如果將資料寫入雲端的Excel服務,就可以在任何有網路的地方進行存取。
因此,本文延續[Python爬蟲教學]活用openpyxl套件將爬取的資料寫入Excel檔案文章,將以Google Sheet(試算表)為例,來分享Python網頁爬蟲串接雲端Excel服務的方式,寫入取得的股票當日行情資料。其中的實作重點包含:
- 啟用Google Sheet API
- 建立Google Sheets API憑證
- 建立Google Sheet
- Python網頁爬蟲串接Google Sheet
- Python網頁爬蟲寫入資料到Google Sheet
一、啟用Google Sheet API
在搜尋的地方輸入「Google Sheets API」,就可以找得到,如下圖:
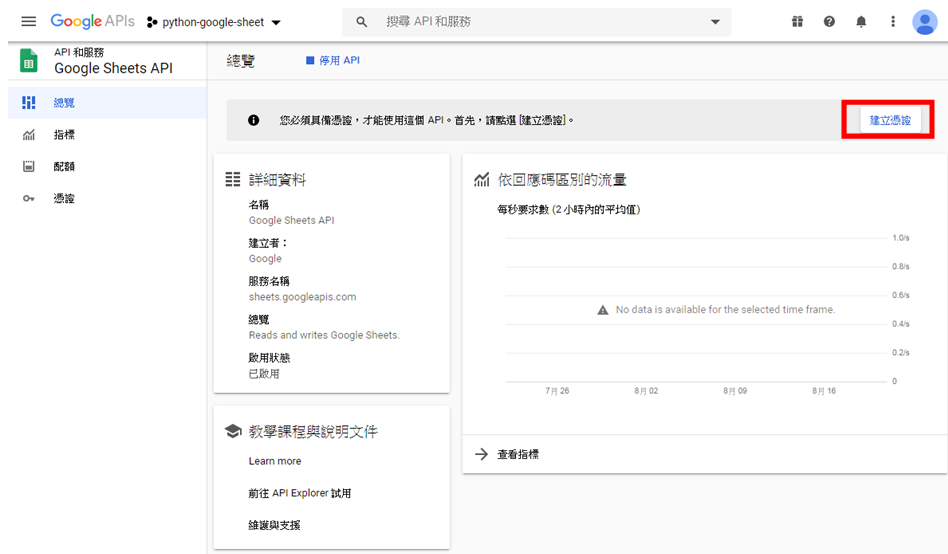
Google Sheets API啟用後,當然不可能隨便讓不明的應用程式來進行呼叫,所以,就需要建立Google Sheets API憑證,讓擁有憑證的應用程式才能進行呼叫存取。而建立的方式可以點擊畫面中的「建立憑證」按鈕,如下圖:
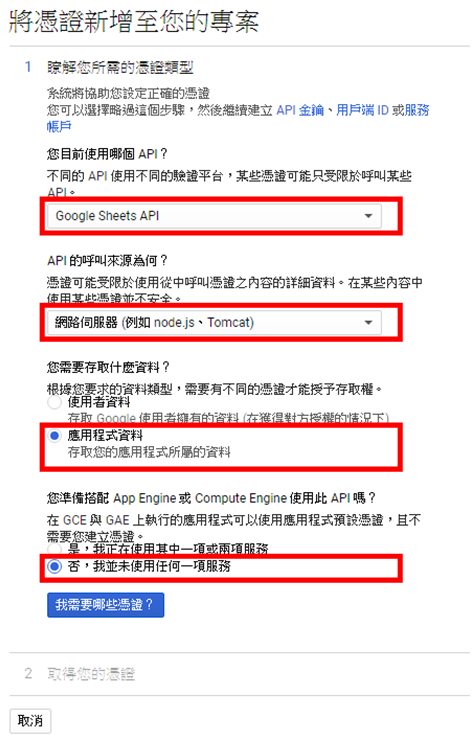
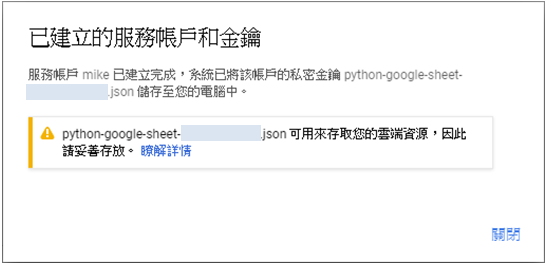
接下來,Google會使用幾個問題,來引導使用者來建立憑證,如下圖:
有了存取Google Sheets API的憑證,現在就要來建立一個空白的Google Sheet(試算表),來存放Python網頁爬蟲所取得的股票當日行情資料。
在Chrome瀏覽器登入Google的帳號後,點擊右上角頭像旁的圖示,往下滑選擇「試算表」,如下圖:
接著點擊畫面右下角的[+],即可建立一個空白的Google Sheet,特別要注意的是在網址的地方,有這個Google Sheet(試算表)的Key(金鑰),在等一下利用Google Sheets API來開啟時,會需要使用到,如下圖:
四、Python網頁爬蟲串接Google Sheet
而要讓Python網頁爬蟲應用程式能夠存取Google Sheet(試算表),首先,Python網頁爬蟲需要使用憑證與Google Sheets API進行驗證,接著,Google Sheets API憑證中提供的一組用戶端郵件(client_email),只要把自己所建立的空白Google Sheet(試算表)共享給這個用戶端郵件(client_email),Python網頁爬蟲就能夠透過Google Sheets API操作Google Sheet(試算表)了。
所以,第一步驟,要讓Python網頁爬蟲能夠使用憑證存取Google Sheets API,需要安裝「gspread」及「oauth2client」兩個套件,分別為Google Sheets API及用戶端的OAuth2驗證。
$ pip install gspread oauth2client完成後,把剛剛所下載的Google Sheets API憑證放置到專案資料夾中,並且,可視個人需要重新命名為credentials.json,如下圖:
接下來,就要把自己建立的空白Google Sheet(試算表)共享給Google Sheets API憑證(credentials.json)中的用戶端郵件(client_email),如此Python網頁爬蟲應用程式即可透過Google Sheets API存取Google Sheet(試算表)。
共享的方式可以點擊Google Sheet(試算表)右上角的「共用」按鈕,會需要先命名Google Sheet(試算表),如下圖:
儲存後,貼上Google Sheets API憑證(credentials.json)中的用戶端郵件(client_email),並且選擇下方顯示資訊,如下圖:
這時候,就可以設定這個用戶端郵件(client_email)的角色,保留預設值「編輯者」,點擊「傳送」按鈕即可完成共用,如下圖:
五、Python網頁爬蟲寫入資料到Google Sheet
開啟scraper.py檔案,引用「gspread」及oauth2client的「ServiceAccountCredentials」模組(Module),如下範例:
import gspread
from oauth2client.service_account import ServiceAccountCredentials
接著,新增gsheet()方法(Method),包含一個要寫入到Google Sheet(試算表)中的股票當日行情資料參數,如下範例:
def gsheet(self, stocks):
由於Google擁有許多的雲端服務,所以需要先定義存取的Scope(範圍),也就是Google Sheet(試算表),如下範例:
def gsheet(self, stocks):
scopes = ["https://spreadsheets.google.com/feeds"]接下來,就可以利用oauth2client的ServiceAccountCredentials模組(Module),讀取Google Sheets API憑證(credentials.json),並且傳入所要存取的Scope(範圍),來進行驗證,如下範例:
def gsheet(self, stocks):
    scopes = ["https://spreadsheets.google.com/feeds"]

    credentials = ServiceAccountCredentials.from_json_keyfile_name(
	    "credentials.json", scopes)
有了Google Sheets API憑證物件後,就可以傳入gspread模組(Module),來進行Google Sheets API的授權,如下範例:
def gsheet(self, stocks):
    scopes = ["https://spreadsheets.google.com/feeds"]

    credentials = ServiceAccountCredentials.from_json_keyfile_name(
	    "credentials.json", scopes)

    client = gspread.authorize(credentials)
接著,就能夠呼叫open_by_key()方法(Method),傳入Google Sheet(試算表)的Key(金鑰),來進行開啟的動作,如下範例:
def gsheet(self, stocks):
    scopes = ["https://spreadsheets.google.com/feeds"]

    credentials = ServiceAccountCredentials.from_json_keyfile_name(
	    "credentials.json", scopes)

    client = gspread.authorize(credentials)

    sheet = client.open_by_key(
	    "1l_kPssgfZdyEpNhvfuK_usm-2tsnYfWx2V04EYyBK4I").sheet1  #第一個工作表
開啟Google Sheet(試算表)的第一個工作表(sheet1)後,就可以比照[Python爬蟲教學]活用openpyxl套件將爬取的資料寫入Excel檔案文章的邏輯,利用Python的BeautifulSoup套件,爬取Yahoo股市當日行情資料的表格標題,來當作工作表(sheet1)的標題列(row),如下範例:
def gsheet(self, stocks):
    scopes = ["https://spreadsheets.google.com/feeds"]

    credentials = ServiceAccountCredentials.from_json_keyfile_name(
	    "credentials.json", scopes)

    client = gspread.authorize(credentials)

    sheet = client.open_by_key(
	    "1l_kPssgfZdyEpNhvfuK_usm-2tsnYfWx2V04EYyBK4I").sheet1

    response = requests.get(
	    "https://tw.stock.yahoo.com/q/q?s=2451")
    soup = BeautifulSoup(response.text, "lxml")

    tables = soup.find_all("table")[2]
    ths = tables.find_all("th")[0:11]
    titles = ("資料日期",) + tuple(th.getText() for th in ths)
範例中,透過requests模組(Module)取得一支股票的當日行情資料HTML原始碼,利用BeautifulSoup套件來進行解析,接著,使用find_all()方法(Method)取得網頁中的所有表格(table)後,取其中的第三個,然後,再利用find_all()方法(Method)取得表格下的前10個標題元素(th)。
由於寫入Google Sheet(試算表)的工作表(sheet1)時,需將資料打包為元組(Tuple)或串列(List),所以上面範例中第18行透過迴圈及BeautifulSoup套件的getText()方法(Method)取得標題文字後,利用tuple()方法(Method)打包為元組(Tuple),而「資料日期」則是想要另外增加的標題。
接下來,就可以呼叫Google Sheets API的append_row()方法(Method),將打包好的資料寫入Google Sheet(試算表)的工作表(sheet1)中,如下範例:
def gsheet(self, stocks):
    scopes = ["https://spreadsheets.google.com/feeds"]

    credentials = ServiceAccountCredentials.from_json_keyfile_name(
	    "credentials.json", scopes)

    client = gspread.authorize(credentials)

    sheet = client.open_by_key(
	    "1l_kPssgfZdyEpNhvfuK_usm-2tsnYfWx2V04EYyBK4I").sheet1

    response = requests.get(
	    "https://tw.stock.yahoo.com/q/q?s=2451")
    soup = BeautifulSoup(response.text, "lxml")

    tables = soup.find_all("table")[2]
    ths = tables.find_all("th")[0:11]
    titles = ("資料日期",) + tuple(th.getText() for th in ths)
    sheet.append_row(titles, 1)
標題列(row)處理好後,股票當日行情資料的部分,先來回顧一下在scraper.py檔案中建立的scrape()方法(Method)回傳結果,如下範例:
[
  ('109/08/21', '2451創見', '13:30', '64.7', '64.7', '64.8', '△0.7', '786', '64.0', '64.4', '64.9', '63.9'),
  ('109/08/21', '2454聯發科', '14:30', '604', '603', '604', '△39', '21,502', '565', '583', '606', '581'),
  ('109/08/21', '2369菱生', '14:30', '11.25', '11.25', '11.30', '△0.45', '1,905', '10.80', '11.10', '11.35', '10.85')
]可以看到資料結構為一個串列(List),其中包含了每一支股票的當日行情資料元組(Tuple),所以,傳入本文所建立的gsheet()方法(Method)後,就能夠利用迴圈進行讀取,然後,使用Google Sheets API的append_row()方法(Method),將每一支股票的當日行情資料元組(Tuple),寫入Google Sheet(試算表)的工作表(sheet1)中,如下範例:
def gsheet(self, stocks):
    scopes = ["https://spreadsheets.google.com/feeds"]

    credentials = ServiceAccountCredentials.from_json_keyfile_name(
	    "credentials.json", scopes)

    client = gspread.authorize(credentials)

    sheet = client.open_by_key(
	    "1l_kPssgfZdyEpNhvfuK_usm-2tsnYfWx2V04EYyBK4I").sheet1

    response = requests.get(
	    "https://tw.stock.yahoo.com/q/q?s=2451")
    soup = BeautifulSoup(response.text, "lxml")

    tables = soup.find_all("table")[2]
    ths = tables.find_all("th")[0:11]
    titles = ("資料日期",) + tuple(th.getText() for th in ths)
    sheet.insert_row(titles, 1)

    for stock in stocks:
	sheet.append_row(stock)
最後,就可以建立Stock物件,傳入想要關注的股票代碼來進行初始化,接著,呼叫scrape()方法(Method),爬取股票的當日行情資料後,傳入gsheet()方法(Method),寫入Google Sheet(試算表)的工作表(sheet1)中,如下範例:
stock = Stock('2451', '2454', '2369')  # 建立Stock物件
stock.gsheet(stock.scrape())  # 將爬取的結果寫入Google Sheet工作表
執行結果
Python網頁爬蟲透過整合Google Sheets API,即可將爬取的網頁資料,寫入雲端Google Sheet(試算表)中,除了能夠隨時在有網路的地方,存取其中的資料,也可以利用Google Sheet(試算表)的共用功能,分享給所需的朋友。您也有關注或想分析的資料嗎?試試本文所分享的技巧,將Python網頁爬蟲取得的資料寫入雲端Google Sheet(試算表)吧,讓您在外地也能夠隨時查看爬取的資料狀態。
有想要看的教學內容嗎?歡迎利用以下的Google表單讓我知道,將有機會成為教學文章,分享給大家😊
Python學習資源
Python網頁爬蟲推薦課程
Python網頁爬蟲-BeautifulSoup教學
Python網頁爬蟲-Selenium教學
Python非同步網頁爬蟲
Python網頁爬蟲應用
Python網頁爬蟲部署
Python網頁爬蟲資料儲存
Python網頁爬蟲技巧


非常實用的資訊,感謝!
回覆刪除想請問一下,剛才文章中提及:把剛剛所下載的Google Sheets API憑證放置到專案資料夾中(https://www.learncodewithmike.com/2020/08/python-write-to-google-sheet.html#:~:text=%E5%89%9B%E5%89%9B%E6%89%80%E4%B8%8B%E8%BC%89%E7%9A%84Google%20Sheets%20API%E6%86%91%E8%AD%89)可是我模組安裝完成後並沒有在該為址找到任何檔案……請問「剛剛所下載的Google Sheets API憑證」是什麼?
回覆刪除希望老師可以在每一行code上面加個#概述一下下面那行在幹嘛,不然像我這樣的菜雞還是有點看不懂.....還要自己google
回覆刪除請問你用的 python 和 pip 是幾版的呢?
回覆刪除